Beaded Board Game Book – at home with Ashley


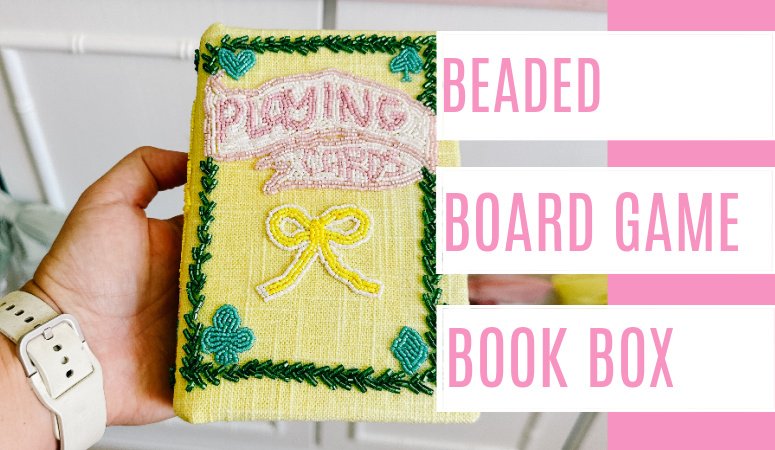
A few years ago, I had the idea to make over my board games. So I put them in boxes that look like books and then made custom labels from vinyl for them. It worked really well! But I’ve been wanting to come up with more variations. Today I want to show you my newest version- a beaded board game book!
I was going on a vacation with my family and our friends and knew we’d have a lot of travel days (we flew to Fiji!). So I prepped a beading travel bag, a book cloth, and off we went. I worked on the beaded playing cards book box over two weeks and loved having a craft while I waited for planes or on the beach or relaxing in the hotel. It was so fun to make, I thought I’d show you how I did it.
- Skill Level: Intermediate
- Time: About 30 hours
- Cost: Around $30
- Best For: Crafting while waiting, slow stitching, heirloom gifts
SUPPLIES
insert shop my widget
step 1- book cloth
To begin, we’re going to make the book cloth. This is probably the most boring step of the whole process, but it’s also super important! If you don’t prep the fabric you’re going to embroider FIRST, it’ll be a big issue when applying it to the book box later.
First of all, measure your book- the height and the width (including the front and back cover and the spine). Make sure to include the measurements of the inside edge of the book cover, back, and spine where the fabric will wrap over. Then add 2″ to the height and width. That’ll give you the size you need to cut your fabric. I cut mine to 8-1/2″ x 12″.


Note, I’m using a linen fabric that I dyed yellow, but any fabric will work!
After your fabric is cut, you’re going to cut a piece of Heat n Bond to the same size as the fabric. For the small book box, I cut it to 8-1/2″ x 12″. Then iron it so the fabric and Heat n Bond are attached.


For the last step for the book cloth, cut a piece of tissue paper to the same 8-1/2″ x 12″ size. Remove the paper backing from the Heat n Bond and iron the tissue paper to the back. This’ll give you a three layered cloth- fabric on the top, Heat n Bond in the middle, and tissue paper on the back.


Why do you need to add the layers to the cloth? Because without them, glue can seep through and ruin all your hard work. I’ve had this happen to me and it’s so frustrating and sad. The layers also stabilize the fabric so it’s a sturdy base to bead onto. It’s best to do this first.


step 2- Design the cover
Next, I decided to design the cover of the beaded board game book. To begin, I traced the book box onto the book cloth so I’d have a clear border for the front, spine, and back of the book.


After that, I looked at a few old fashioned books I own and patterned the playing cards cover from that. I drew it on paper so I could practice first. I made a banner for the “Playing” word, created a leafy banner, put a bow on it, and added playing card icons in the corners (heart, spade, clover, and diamond). To color it in, I used watercolor so I knew what color I wanted the elements.


Then, I used a water soluble pen and drew the design onto the book cloth.


step 3- travel beading kit
I thought I’d share what I pack in my travel beading kit and why. Note, this was super convenient to have on the go! I also like having a kit when beading at home. That way I can grab a small bag and have everything I need right at my fingertips.


- Makeup bag– I like having a small bag to hold everything. It has a zippered closure to keep the supplies in the bag.
- Beads– For the most part, I like using 11/0 seed beads. I’m partial to the Japanese Miyuki beads. I bought 5 colors for this project.


- Larger Bead Container– I also brought a bigger bead container with a screw on lid. That way I could pinch some beads in my fingers for beading. It was an easy method during travel.
- Bead Funnel– To move the beads out of the big container back into their smaller tube, I kept a small beading funnel with me.


- Size 10 Beading Needles– The thin metal base on these are the perfect size for small seed beads. I tried size 12, but it’s smaller and really hard to get the string through. I much prefer the size 10. If you’re traveling, bring 2–4 extra needles since they break easily.
- Beading Thread– I like this braided and fused bead thread- it fits nicely through the size 10 needle and is strong enough to not break.


- Water Soluble Pen (not shown)- I also tuck a water soluble pen in my beading kit. That way if I decide to add elements to the beading, I can draw it on. Later, this will disappear with water.
- Folding Scissors– For cutting the thread when starting to bead. These are compact and perfect for travel. I’ve taken them through many airports and never had a problem.
I also put my book cloth with the pattern drawn on in a plastic ziplock bag and tucked it into the beading bag. It’s nice to have it in plastic so the water soluble pen doesn’t get washed off. One day I left it out and the humidity really lightened it, so it’s best to keep it in a bag when not working on it.
step 4- beading tips
Now that you’ve got your book cloth and your supplies, it’s time to start beading. Here are my best tips-


Number one, work with one color of bead and do everything on the cover in that color. I started with yellow and did the bows first. Using one color at a time is more efficient. And since I switch my beads in and out of the larger container, this meant potentially losing less beads during that transition.


Number two, here’s how I like to bead- I’ll make a knot at the end of the string- I usually do 3 knots so it’s super secure. Then I push the needle from the back of the fabric to the front where I want the first bead. Next, string the beads- I’ll string however many beads are needed- anywhere from 1-9 beads. Then I tack the beads down.


If I’m containing the line of beads, I come back up right between the last two beads I put down. Then I’ll push my needle through the center of those beads and add more beads onto the needle. This keeps a continuous line that is nice and straight.


Number three, if I have a long area to bead, I like to use a strand with a maximum of 9-10 beads at a time. So I’ll put 9 beads on the needle and then pull the string down and hold the beads tight to see where it’ll hit on the fabric. Then I push my needle through the front of the fabric at that point. 9 beads is a long section, so I go back and tack down the beads every 2-3 beads.


Once again, if I’m continuing the line of beads, I’ll backtrack to the last 2-3 beads I beaded and go through the center to keep the line straight.


And that’s pretty much the method! It’s like coloring in with beads where you’ve marked on the fabric. It’s slow and a little repetitive since you do it over and over. But it’s also really exciting seeing the image slowly come together!


step 5- glue the book cloth on


Finally, it’s time to attach the book cloth to the book box. For that, I put Elmer’s glue into a small container that I use with a foam brush. I like to have a bone folder, scissors, and a water soluble pen handy as well.


Apply Elmer’s glue to the cover and spine with the foam brush and spread it all over those surfaces. Use a generous coat so the fabric adheres well (these edges can be stubborn, so don’t be afraid to add a little more glue.).


Use a bone folder to push the cover in place. Make sure it’s exactly where you want it! If it’s not lined up correctly it’ll look bad and you don’t want that after spending hours beading!


Apply glue to the back cover and repeat the last step.


Once the covers are in place, fold over the fabric and use a water soluble pen to mark where the fabric hits the book box “pages.” I like using a water soluble pen because it usually gets wet later from the glue and erases- leaving the fabric clean.


Use scissors to cut where you marked on the fabric.


On the corners, cut a 45 degree angled cut. Don’t cut it too close to the cover!


Apply glue to the fabric on the inside edges of the top and bottom of the book box.


Begin pushing it into place with the bone folder. It can be tricky to get these parts to stick, so use extra glue if needed. Glue down the top and bottom before moving onto the sides of the book box.


I still had some of the water soluble pen on my book cloth. So I used a wet washcloth to get that and any glue off the book box. I also spritzed it with water to remove any that was behind the beads. I didn’t do this step earlier because I used the water soluble to mark where the book cloth should hit the book box and I wanted to have that on for this step.
after


And here is how the board game book turned out! Isn’t it so cute?!


The beading feels so fancy. And that’s because it is! It’s hours of work and looks very high end.


This is a slow and labor intensive project. But how fun that it leads to an heirloom quality book box?!
price breakdown


I spent about $30 on supplies. I had everything on hand besides the beads and beading needles.
time spent


I’d estimate this project took around 30 hours to make the beaded board game book. I am newer at beading so I was probably slow because of that. But I really enjoyed making it!


If you’ve been looking for a slow, satisfying craft, I can’t recommend this project enough. It takes time, but watching the design slowly come to life bead by bead is so rewarding, and the finished book feels like a little piece of art. I already have ideas for more versions of book boxes. Let me know in the comments- how should I makeover a board game book box next?!
 This post contains some affiliate links for your convenience. Click here to read my full disclosure policy.
If you love it, pin “beaded board game book!”


Related